You are frustrated; you turn the computer on and it gives you an error asking you to login using biometrics or to use a password, you get this error:
"This computer system,,#XXXXXXX-YYYY, is protected by a password
authentication system. You Cannot Access the data on this computer
without the correct password."
Then it either says: "Please type in the primary or administrator password and press Enter"
or it tells you to login / authenticate using biometric / fingerprint scanner (If it asks you to authenticate using biometric, just swipe your finger numerous times until it asks you to press enter and enter a password, then follow the steps below)
Well fear not! There are many services out there that can help you resolve this issue (Some asks you to pay money, Dell asks you to give the original owner info etc.) but the next one I'll give you is free, in case your service tag is in the compatible list.
If your service tag ends with: 595B, 2A7B, D35B, A95B, then you still have hope; follow this link: http://biospassword.eu/free/ and click on "Dell Bios/HDD" tab if it isn't already the current tab you are in, then enter your service tag in the field as asked (XXXXXXX-YYYY) where "XXXXXXX" is the number you enter as shown in the faulty computer. Click on calculate and it should give you a password down below, type that password (Case sensitive, follow the uppercase and lowercase carefully when you type) and press enter (you won't see the password being typed, just type it when it asks for you to type it or after you press enter), you should then be prompted with a menu that asks you to either press F1 or F2, press F2 and go in the BIOS settings and go to security > Password and retype the password in there but don't add a password anymore but click apply, this should remove the password and you should be able to boot the computer just fine.
These additional links might help you change your service tag if it does not belong to the list above:
http://community.spiceworks.com/how_to/1532-how-to-change-dell-service-tag-on-latitude-and-inspirion-laptop
http://www.anchor.com.au/blog/2013/06/how-hard-is-it-to-set-the-service-tag-on-a-dell-motherboard/
I hope this resolved your issue, let me now if you have any other tips or if this worked for you!
Showing posts with label Tutorial. Show all posts
Showing posts with label Tutorial. Show all posts
Tuesday, January 26, 2016

Tuesday, July 7, 2015
How to fix JAVA garbled/broken text rendering on buttons in swing (eclipse, netbeans)

As you start exploring the world of Swing, JFrames, JButtons etc, it's probable that you ran into a problem where the text on your buttons and frame are all garbled up, broken, ripped, whatever else you call it.
This happens when there's a conflict between swing's rendering and your graphics card, but fear not, below are a list of fixes and you may chose what works best for you!
Fix 1 - Use a dedicated GPU with java (Semi recommended)

This will solve the problem in eclipse, but sometimes not in Netbeans, so let's move on to the next solution.
Fix 2 - Disable cleartype (Not recommended)
Another temporary fix to this problem is to disable cleartype, a visual text amelioration in Windows machines, you can find this by going to your start menu and typing "Cleartype", from there, you can edit or temporarily check/uncheck the "enable cleartype" option. This will fix your problem, but then you will be left with ugly font rendering while browsing the internet and using your computer.
Fix 3 - Update your graphics card driver (Best fix)
This method is the simplest but also what I consider the "norm" fix for this problem, as it solved mine without having to always use my dedicated graphics card or disable cleartype.
You just lookup your Graphics card model, go to google and search for drivers for that one card, remember to get your drivers from official websites if possible in my case "intel HD 4000 driver", after installation, you will need to reboot your computer and then you're good to go! no more ugly text rendering.
Let me know if this hasn't fixed the problem but I hope it worked for you too.
Wednesday, May 28, 2014
How to fix "Unfortunately, Trebuchet has stopped" for Android
If you are reading this article, it is most likely because you just tried out that flashy new ROM (mostly Cyanogen) for your android phone, and chances are that you ended up having your phone displaying "Unfortunately, trebuchet has stopped". You press the okay button, but it just keeps returning until you try to reboot the phone and the same goes over and over again.
Well fear not! I have a step by step solution that might just come in handy for you. So let's start!


------------------------------------------------------------------------------------------------------------------------
Well fear not! I have a step by step solution that might just come in handy for you. So let's start!
Lay your finger on the top right of the screen and swipe it down. This might be a bit of a challenge since the popup error might popup anytime you do it.
Go to your settings by clicking on the settings icon.
Scroll down and go to your app settings, as shown above.
Slide to the far right tab and scroll down until you find trebuchet ,click on it.
Press "force stop" to stop the application, then move down to the cache and storage settings.
Now press "Clear data" and "Clear cache" to free up your Cache and Data that Trebuchet uses.
There you go! I hope I've spoonfed you enough, after this you may reboot your phone or if it works just like that, you can just keep it.
Si vous lisez cet article, il est probable que vous venez d'essayer une nouvelle ROM (surtout de cyanogen) pour votre téléphone Android, et les chances sont que votre telephone n'arrete pas d'afficher "Malheureusement, trébuchet s'est arreté". Vous appuyez sur le bouton ok, mais il ne cesse de revenir jusqu'à ce que vous essayez de redémarrer le téléphone et la même chose s'affiche encore et encore.
Eh bien n'ayez pas peur! Cette article vous demontre étape par étape la solution qui pourrait bien être utile pour vous. Commençons donc!
Eh bien n'ayez pas peur! Cette article vous demontre étape par étape la solution qui pourrait bien être utile pour vous. Commençons donc!
Posez votre doigt sur le coin supérieur droit de l'écran et faites glisser vers le bas. C'est peut-être un peu un défi puisque l'erreur contextuel peut apparaître quand vous le faites.
Allez à vos paramètres en cliquant sur l'icône des paramètres.
Descendez et allez à vos paramètres d'applications, comme indiqué ci-dessus.
Faites glisser jusqu'a l'onglet tout à droite et descendez jusqu'à ce que vous trouvez trébuchet, cliquez dessus.
Appuyez sur "Forcer l'arret" pour arrêter l'application, puis descendre vers les paramètres de cache et de stockage.
Maintenant,
appuyez sur "Effacer les données" et "Effacer le cache" pour libérer la
mémoire cache et données qu'utilise Trebuchet.
J'espère que cela vous a aidé, après cela, vous pouvez redémarrer votre téléphone ou si il fonctionne comme ça, vous pouvez simplement utiliser le telephone.
Friday, January 10, 2014
Fixing Kali linux errors. (startx not found, "oh no! something has gone wrong" etc)
After your fresh install of kali, you might run into some problems.
One of them consists of the login screen missing and returning:

If you get the following error:
Don't forget to make sure that all your packages are up to date.
Please leave a link if you copy this tutorial.
One of them consists of the login screen missing and returning:
"Oh no! Something has gone wrong.To fix this issue (a temporary fix), press CTRL+ALT+F1, it will take you to the terminal. From there, check if you can use the command "startx"
A problem has occured and the system can't recover. Please contact a system administrator"
If you get the following error:
root@kali:~#startx
-bash: startx: command not foundThe problem would be that you don't have the x window system functioning yet, install it by using the command:
apt-get install x-window-systemLet it install and from there, you should be able to access your graphical user interface using "startx"
Don't forget to make sure that all your packages are up to date.
Please leave a link if you copy this tutorial.
Apres une installation de kali linux, vous avez peut etre rencontrée la probleme suivante:

Si il retourne l'erreur suivante:
Verifiez que tous vos paquets sont mis a jour.
Veuillez laisser un indice si vous copiez ce guide.
"Oh Mince, quelque chose s'est mal passéPour resoudre cette probleme (resolution temporaire), appuiyez sur CTRL+ALT+F1, pour ouvrir le terminal.Dans le terminal, voyez si vous pouvez executer la commande "startx"
Oh mince! Quelque chose s'est mal passé. Un problème est survenu et le système ne peut pas se récupérer. Déconnectez-vous et essayez à nouveau.
"
Si il retourne l'erreur suivante:
root@kali:~#startx
-bash: startx: command not foundIl est possible que vous n'avez pas encore la systeme de fenetre X (x window system) installée, ulilisez cette commande pout l'installer:
apt-get install x-window-systemLaisse installer, Apres installation, vous pouvez maintenant acceder a l'interface graphique avec la commande "startx"
Verifiez que tous vos paquets sont mis a jour.
Veuillez laisser un indice si vous copiez ce guide.
Monday, May 27, 2013
How to take better cell phone photography
You don't always have to rely on buying the new cell phone on the market in order to take great phone photos, you just need a little bit more creativity and improve your photos everyday.
These photos were taken with the samsung captivate i897, 5mp camera.
//changelog
Alright :) so here comes the samsung captivate sample photos after it's been flashed to Android 4.2.2, CM10.1 :)Notice that the old stock froyo didn't have all these lovely options, if you're familiar with photography and SLR cameras, you'll love the new features-In camera HDR-Manual exposure-Manual focusing (including macro now)-up to 1600 ISO-Better Panorama engine.
I think that's enough words and I'll let you enjoy some sample pics.


These photos were taken with the samsung captivate i897, 5mp camera.
//changelog
Alright :) so here comes the samsung captivate sample photos after it's been flashed to Android 4.2.2, CM10.1 :)Notice that the old stock froyo didn't have all these lovely options, if you're familiar with photography and SLR cameras, you'll love the new features-In camera HDR-Manual exposure-Manual focusing (including macro now)-up to 1600 ISO-Better Panorama engine.
I think that's enough words and I'll let you enjoy some sample pics.
Click images to view bigger size
 Black background: This was taken at 4:00PM , using the sun as lighting.
The key is to isolate anything else from your key element, the main focus you want the viewer to see. Use exposure settings in your phone and black clothing to get your background right, make sure the light doesn't reflect on the cloth.


The key is to isolate anything else from your key element, the main focus you want the viewer to see. Use exposure settings in your phone and black clothing to get your background right, make sure the light doesn't reflect on the cloth.
Demonstrating the use of the rule of thirds. If I've centered the image to the key element, it would probably look less good and too dull, try not to always put your main focus to the center.
Retouching is a great way to improve your photos, play around with saturations, contrast, brightness and curves, make sure not to abuse it , it will cause bad effects if so, retouching gives a more lively effect especially if your phone gives dull colors.
Play around with light and objects around your reach and learn to compose scenes, learn to use your phone's exposure settings to get you the desired lighting, in this scene, Four soda bottles were used and a 17 inch notebook, the light comes from a white page and the built in exposure functions in the phone helped give the blue tint.
Well that's all I have today folks, I hope you enjoyed the small article and don't forget to leave a comment below in case you have anything to add.
Friday, May 24, 2013
How to unbrick Samsung captivate I897 (stuck on semaphore boot logo)
If you're reading this right now it It's possible that you've got your samsung captivate bricked, or so.
You should be able to fix it with this method if your problem is in the following list:
.jpg "Semaphore logo samsung captivate")
"So how do I fix this?"
.jpg "Samsung captivate download mode")

.jpg)

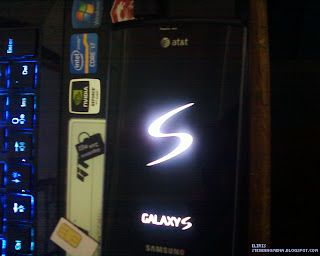.jpg "Captivate fixed")
There you have it!
The phone should be fully working again and will be back to the old android you had.
Please take some time to view this thread and thank DesignGear for some info he has done:
http://forum.xda-developers.com/showthread.php?t=731989
http://forum.xda-developers.com/showthread.php?t=731989
You should be able to fix it with this method if your problem is in the following list:
-Samsung captivate stuck on boot screen
-Samsung captivate stuck on semaphore logo
-Samsung captivate stuck on semaphore logo
-Samsung captivate white / grey battery charging icon when plugged in.
-Samsung captivate won't make salad
In my case, I've had my captivate on CM10, a ROM failed to install (RemICS-JB v4.0) and the phone got "bricked".
Here is a picture of how it looks like:
.jpg "Semaphore logo samsung captivate")
It doesn't go anywhere, you can't go to any settings or anything, it just stays there.
"So how do I fix this?"
The first thing you need to do is to take off your sim card and your sd card, also take your battery off as it's the only way to turn off the phone. Then comes some steps.
Step 1:
Download and install the correct USB drivers for your samsung captivate if you are using windows.
Don't know how to use google? here are the links:
Don't know how to use google? here are the links:
Step 2:
Download Odin(the One click downloader) (I897UCJF6 - Odin 3)
The links can be found here:
The links can be found here:
http://www.mediafire.com/?0w2y31maz8mdom4
http://www.multiupload.com/XAZUYNXSC1
(thanks to Designgears for the upload)
http://www.multiupload.com/XAZUYNXSC1
(thanks to Designgears for the upload)
Step 3:
Enter download mode - this can be done by re-inserting the battery, plugging the phone to a cable (do not power on) and press both the + and - buttons.
When your captivate is in download mode, it should look like this:
.jpg "Samsung captivate download mode")
Step 4:
Keep your phone plugged into your computer while it's on download mode, and launch Odin

Let it recognize your device and click on "Start"
.jpg)
It should give you a bunch of all the mumble jumble you need to know if you want the details. This is the part you go to the kitchen and make coffee while waiting for it to finish.

When it's done, it should tell you "PASS!"
.jpg "Captivate fixed")
Your phone will reboot afterwards, then go to some sort of self configuration from the recovery mode and reboot again, it might reboot a few times but just wait for it to finish.
There you have it!
The phone should be fully working again and will be back to the old android you had.
I hope this worked for you and have a nice day sir.
Saturday, December 29, 2012

Thursday, November 1, 2012


Subscribe to:
Posts (Atom)